Search

Translate

Showing posts with label Tutorial. Show all posts

Monday, 13 May 2013

Cutie Cushion Covers and Tie-Dye!! x x


Cutie Cushion Covers!!
Get Stuck in!!  Today i will talk about another fun activity that is productive and fun!! It saves money and is a lovely thing to experiment with and explore textures and patterns with friends or family, a great family activity for a rainy day!!


You will need:

Other accessories: E.g ~Buttons~

This activity can take up to an hour. But if you hand sew it could take longer, by hey-ho it is all part of the fun , right guys?? ;)


~Cut you're material (to the size wanted from you're cushion) you need one square piece for the front of your cushion and two rectangular ones for the back (Tip- The two rectangle should both be equal to half the size of the square front) This should leave you with 3 pieces ... Correct?? haha


~Cut and fit the viola to each piece of material, and iron it into place


~Next you need to pin the pieces together so that the two back rectangles slightly overlap to the front square piece of cushion!!


~ Sew all the pieces together ,with you're sewing machine, 

or by hand!! 


~This next step could be done by ribbon or zip, the ribbon is easier so that is what i will tell you...

Attach ribbon to each side of the split in the back to creat a seal for the cushion!! Fold over the ribbon and pin it to the rectangular material , then stitch it on (by hand or by machine). Do this with two bits of ribbon on atleast two or three poiints on  the cushion. You should do this with buttons or ribbons or even a zip, so have fun explore and experiment with it!!


~Put the cushion stuffing in and tie up the cover!! There you have it!!


But what about spicing it up with a tie-dye design!! Give that burst of summer!! 
For £16.67 you can add that extra color, and brightness, i have made a tie-dye cushion too!! 


I would Love to say a big Thank you for all our viewers support!! It means so much!! Thank you , Hope you enjoyed this article, if you have any ideas for new articles or have any questions please comment below, i would also love to see some cushions, i would love for them to be posted on our Facebook page!! 
Thank you so much guys, Much Love Buttercup x x 


Pictures are from Google. We have no ownership or copyright over these letters. All copyright belongs to Google.com and the original owners.

Tuesday, 22 January 2013

Colour your hair Naturally!

Hey guys, 
Recently I decided that I wanted a new hair colour, but wanted it to stay natural.Im not an overwhelming fan of using hair dye, as im a pretty spontaneous person, and know that i'll be unhappy with the results in a few weeks, and its also not very good for your hair! I had already heard of some of the common , popular ones like using lemon juice, but seeing as their is pretty much no sun in England, and I can't be bothered to wait till summer, I wanted things I could do any day, and henna : Where on earth do you buy that from? So I decided to try some new ways of dying your hair , without nasty chemicals! So here are a list of some of the ways, while still keeping that natural finish.

 Enjoy, 
The Country Rose 


English: A photo of a cup of coffee. Esperanto...
1. Coffee! ( To Darken) 
Yes, you did read that right! You can dye your hair naturally a few shades Darker with coffee. I myself am planning to try this look. 


And its pretty simple too. Continue to use this look until your happy with the colour. But personally if your going for the natural sort of look, i would do it twice or three times.Lasts until you stop doing it basically. And totally does not damage your hair! Brilliant :) 


You Will Need : 
- A sink
- Cup
- A strong cup of black coffee ( Or if you want
a lighter look, go for a lighter colour coffee,
 but know that this will not be as affective or noticable.)

Instructions : Brew some nice strong coffee : Preferable a strong brand. Leave it black, and give it time to cool.Pour into the sink.

Brush your hair thoroughly , as this will make it easier for the colour to soak in.Soak and massage it into your hair for fifteen minutes( More if you desire more noticable results)

And leave it in your hair for another fifteen minutes or so.You can keep your hair in a clip or band, but don't wrap it in a towel, because this will absorb all the coffee!

 Rinse hair with warm water.

Tip : If you are a light blonde the results will be more dynamic and dramatic! Test the colour on a small section of your hair first.


2.Honey ( Lightener) 
Honey can do this because of the peroxide it releases.And its very easy, but the downside is that it takes a while for the results to show.

Instructions: 
Add some honey to your conditioner every time you condition, and you should notice results in a few weeks or so.


3.Carrot and beet juice! ( Red)
Don't want to use henna for a redish tint? Carrot and beetroot juice can add the same affects to your hair.


Instructions : Mix half a cup of beet juice to half a cup of carrot juice .Pour this over damp hair and dry your hair for about thirty minutes.Leave the rest to dry naturally.If your not satisfied with the intensity of the red, repeat the application for a few weeks.


4.Tea !


Black tea – this can act as an effective stain or dye for darkening hair. Brew a very strong mix of loose tea or tea bags with boiling water. Strain and allow to cool completely before applying to hair ensuring complete saturation.
Chamomile tea – works for highlighting fair high or for subtly lightening blond/ fair hair. Prepare as for black tea.

5.Paprica! ( Red) 
I sure know that I have some in my cupboard , so why not give it a go for reddish tints? So here is how.
Tip : Paprica gives particularly good results with Rose hip tea. ( or make your own with rose petals and boiling water).

Instructions: 
Make a paste using the paprica, either mixed with the tea, or with just water. Comb it into your hair.

6.Coco- powder! ( Darker) 
This is really cool , and I know I have some coco powder somewhere, so its easily do-able too! 
Instructions :
Take half of your normal shampoo , and fill the rest of the bottle up with coco-powder. Mix well. Use like normal shampoo. Three times should do it ! ( More if you would prefer a darker colour)

Vinegar and soy-sauce!
Both of these are things that I always have at home, and its so easy to do.
Instructions:
Make a mixture of both Vinegar and soy-sauce and use it as a conditioner when you shower! Leave it in for 2-5 minutes, and rinse it out.

Thankyou for reading! Protect your hair this year, switch to a natural dyer instead
Remember to use these things with caution if you have light hair, as these are generally made for people with darker hair. But many such as the Camomile tea and Honey are suitable for all hair colours! <3 


Pictures are from Google. We have no ownership or copyright over these letters. All copyright belongs to Google.com and the original owners.

Tea , just like coffee, can also dye your hair.

Saturday, 12 January 2013

Easy Vintage hairstyles to try today!

Hey Guys! 
Want to learn how to make pretty Vintage hairstyles that arn't waay to difficult to achieve. I tried to pick things that you can easily personalize and would be suitable for many hair lengths and styles. Enjoy and follow us on twitter @VCountryRose 


CountryRose 

The Scarf tied up-do.
This look must be one of my favorites. Its so easy to mix up and change. 

Some tips : 
If you want a girly look , go for florals
Want a more modern look? Go for red's and blacks , and bold patterns. 

Spritz a volume boosting spray into your damp hair .Create a deep side parting ( Or experiment if you would like ) and tie your hair in a ponytail at the top of your head. Take random strands of your hair and gently tug them out of the up-do for a more messy, relaxed look.Create gentle curls with your curling iron. When the curls have cooled , and your happy with your look , you may want to rake your fingers through your hair to break them up and randomly pin the curls into a messy bun.Tie a pretty scarf around your head to complete the look. Simple and Versatile.Done!

Time Taken : 4-6 minutes ( depending on how many curls you put in your hair ) 

Side Pony-tail with a teased crown

I absolutely love this one. Your hair does have to be medium - long to work best with this look.But feel free to try it.This look is all about volume, don't be afraid to go the extra mile with it.

Some tips : 
Why not give it a tousled , beachy look.
Add a flower for extra glam

I find its easier if you turn your hair upside down and spray a generous amount of dry shampoo ( love the stuff) throughout your hair to help with volume. Then apply the dry shampoo to your crown , teasing with a comb to create lift.Smooth over the teased area a little , and place bobby pins in to keep it all up.Then tie your hair into a side ponytail behind your ear , keeping the front flat and finish with a spritz of volumizing finishing spray.

Time Taken : 6-9 minutes 


The Geometric cut 
This look can really help to define your cheekbones , but is only for the brave. This bold cut is also very easy to style. Dare for the cut! 

Use a great conditioner , to make your hair look very soft and shiny.Blow dry with a paddle-brush and them smooth a bit of anti-frizz to keep it all looking glossy and smooth. Well worth it ! 


Time Taken: 3-5 minutes

High Ponytail bound twice 

This one helps you look glamorous , but is also practical. A top tip is to keep it the main focus, by wearing minimalistic makeup .

Brush your hair and pull it up into a high ponytail.Smooth hair with a touch of gel , and secure with a hairband of your choice ( but preferably a plain coloured one that matches your hair colour , so that it is not too noticeable . Brush out the ponytail and add another hair band two inches down , and brush out your ponytail again. Finish by rubbing a dab of cream into the palms of your hands , and smooth it over your ponytail for added shine.

Time Taken : 5 minutes


Soft wave bob with a low side parting.
Ok now this one is really simple, but will look beautiful and romantic. Again , it would be best if you wore simple make-up.This one is best for people with shorter hair , but don't let it put you off giving this look a go.
Spray each 1-inch section of your hair with two to three spritz's of hairspray and put it into a hair roller. When the rollers feel cool , let your hair down. Spray some dry shampoo at the crown of your head , let it dry of course , then brush your hair out , gently as to not remove any of the curls! And shape with your fingers , finished.

Time Taken : 10 minutes

Long Curls! ( Or short curls )

This look , i would happily wear everyday if I could. Glamorous, feminine and perfect.It takes a little longer to achieve naturally , and will have to be taken care with to ensure it looks its best.

Top tips : 

Use dry shampoo when curling , it makes hair more manageable. 

Wash your hair with a volumous shampoo.And either let your hair dry naturally , or dry it with a hair dryer with a large round brush.Curl your hair with hot rollers, or if you would like: a curling wand. Spritz on some volumising spray to create texture.Finish with a touch of hairspray , to hold your look in place.


Time Taken: 20-30 minutes ( Takes a little longer than the rest , but i assure you its worth it) 


Teased double bun
I absolutely ADORE this one.Simply to achieve , but stunning to look at! Beautiful , elegant and romantic.The key is to try not to make your hair look perfect , but to let it fall naturally.

Top tip : 

Why not make it edgy with strong metallic makeup? 

Split your hair into two sections , creating a parting in the middle of your head , from one ear to the other.Clip the top section out of the way, then take the lower half and do whatever you  would prefer to use , to make your hair more volumous. ( Volume spray, teasing with a combe, etc) Then wrap the lower sections of your hair into a loose bun, using pins to keep the ends in place.Then take the top section of your hair , and spray generously with hairspray, before backcombing your roots , to give you the modern "Beehive" affect.Secure the pouf with bobby pins , before tying the top section into a ponytail.On the last turn of your hairband, don't pull the ends of your hair through.Lastly, gently tug the looped pony, so that it hangs over the lower bun.

Beautiful 

Time taken: 20 minutes , if like me you are a perfectionist and want to make sure everything looks right.


Rolled Back-updo

This is one look that I hardly ever see people wear.Which is such a shame.Beautiful and iconic to the vintage times , the rolled back-updo puts all the emphasis on your face.So I reccomend a bright lipstick and minimal eye-makeup.

Lightly spray texturising spray onto  your hair to make it light , and easy to grip.Blow dry it back for texture.Part it in the middle.Twist one side back and pin it in place at the nape of your neck : and repeat on the opposite side.Then connect the ends and twist them back into a soft bun.Finish with a very light touch of hairspray.


Time taken:  5-8 minutes

And lastly , 
My favorite , 

Finger Waves!

The finger waves , traditionally worn by the likes of Marilyn Monroe.Flirty and beautiful. More easily accomplished with short - medium hair length.
Marilyn Monroe
Marilyn Monroe

Start with dry hair. Work in 1-2 inch sections, lightly spray each section with a texturizing mist , and wind into it with hot rollers. Or a curling iron ( This will take longer).When the rollers are cool, sculpt the curls with your fingertips , and finish with a spritz of hairspray for hold.

Time Taken : 10-13 minutes.


Thankyou very much for reading.Feel free to try any of these hair styles , and your more than welcome to comment in the box below! Tell us how your hair styling experience went.And your welcome to send us pictures on our facebook page of your hair!


Some times have been  approximated but will differ depending on hair length, thickness and condition. Care in handling hot equiptment.If you are under 12 we urge you to have a parents permission to use hot hair equiptment.Copyright of VintageCountryRose Co.Marilyn Monroe photo credit Sasha065


Pictures are from Google. We have no ownership or copyright over these letters. All copyright belongs to Google.com and the original owners.
Enhanced by Zemanta

Thursday, 27 December 2012

Learn to Shabby Chic and Decoupage with Butterup, my Co-Writer!! x

Hey Everyone, i am The Country Rose's friend Buttercup. In fact if you look on the website i am the co-writer and co-manager!! How exciting is that?? Anyway i am a massive fan of shabby Chic interior so i thought i would tell you a bit about it! The interior of Shabby Chic is a vintage styled interior however it doesn't have to be vintage to create the look of Shabby Chic!
Shabby Chic  - The easy way!!
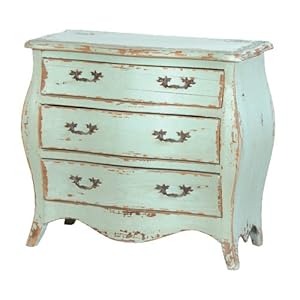
An easy way to perform a quick and easy Shabby Chic makeover is To transform your chest of drawers!
First of you simply would paint it an undercoat of the colour you want to show through (it could just be wood in which case you don't have to paint it) Leave to dry!
Then simply paint over it , with a different colour ; when this has dried simply get some sandpaper and sand paper away part of the top coat were you want to to make an authentic look!
You could also add some Decoupage to this look. What is Decoupage though buttercup you may say? Well lets find out...


Decoupage 
Another Great thing to do is Decoupage , Many people decoupage their mirror frames it is a wonderful creative thing to do!
You Start off by buying some pictures or tissue paper. The best thing to do it with is thin tissue paper made specially for doing decoupage. Which you can get from some craft shops. It is a simple thing to do , here are some simple instructions:
1. Start off by making sure the item you are going to decoupage is dry and clean (if you are going to paint it first make sure it is completely dry first)
2. Cut out squares of tissue paper or pictures you want to use!
3. Arrange the layout you are going to stick your pictures/ tissue paper!
4. Working in small areas of your frame at a time, take off your bits of tissue paper / pictures and apply them back on with glue, brushing the glue all over the paper!
5. Smooth each bit down carefully using your finger.
6. Continue this until it is covered all over and you are happy with the result.
7.leave to dry then you are ready to use your decoupage furniture!

And their you have it , i am a fan of decoupage myself and it is fun to do i can tell you! You can add decoupage to all kinds of furniture, chairs,wardrobes,tables,chest of draws etc.. the list goes on! What i love about decoupage is you can personalize it yourself with your own pictures and it is a great thing to do on a rainy day! So Try it yourself to get the best out of your furniture!

Hope you enjoyed my first section , 
Buttercup :D xx
Pictures are from Google. We have no ownership or copyright over these letters. All copyright belongs to Google.com and the original owners.
Enhanced by Zemanta